Sunday, September 11, 2016

Building Fact Fluency

Aloha, Friends! 
Today I'm here to share a tip with you on building fact fluency with your students.

I'm not sure about you..but my students always seem to struggle with their addition facts when they enter third grade. Don't even get me started with the subtraction facts either! lol. I also hear from the 4th, 5th, and 6th grade teachers at my school that it is a never ending battle. Each year the kids just DO NOT know their facts. 

As teachers, if we expect our students to know their facts, we need to allow them the time to practice their facts! In an ideal world, they would actually be practicing at home, but we KNOW this doesn't happen at home for most! 

In my classroom, each day of our math block begins with Math Drills. This seriously only takes about 5 minutes of our block, and I see improvements daily. Rather than making copies and having them pile up on my desk wasting a ton of paper, I print one copy of each drill and insert them into clear sheet protectors. 


Then all of the sheet protectors go into their math drill folder. 

The students use their dry erase markers to do their drills. I quickly go over the answers and the students correct their own drills. We don't log our grades anywhere. The students take a mental note of how they did for the day, and they are challenged to beat their scores the next day. 

I get my drills from this awesome site: math-drills.comhttp://www.math-drills.com .
You can print addition, subtraction, multiplication an division drills. I begin each year with addition. At the start of this school year, most of my kiddos couldn't even get through half of the page (50 problems on each page). After about a month or so..almost the entire class was whizzing through the entire page-with accuracy! 
Now, we are currently working on our subtraction facts. Eventually, we will add in multiplication drill pages as well. I usually add in 4 different sets of each operation. This way we can change it up each day. The drills from the website are already labeled 'drill a', 'drill b', and so on. This makes for easy reference to which drill set we will be working on.


The best thing about is this is that it's easy and the kids WILL get their facts down! 
I recommend getting thicker sheet protectors, because they will last longer. I am still using the same drill folders from 2 years ago! 

I've also got a little treat for you today :)

I've created some labels for you to add to your math drill folders! All you need to do is print, laminate, and tape onto the front cover of the folders. I have included a black and white version to save on ink. You could easily print on colored paper for a pop of color. Also, there are red, orange, yellow, green, blue, and purple labels in this file. 

You can pick these labels up in my TpT Store for FREE! 

If you decide to use these drill in the classroom I would love to hear about it OR see it!  Tag me in a photo (@teachinginparadise) on instagram so I can check out your math drill folders!! 

Thanks for stopping by today! 

Sunday, September 4, 2016

Weekly Homework Routine in my 3rd Grade Classroom

When I first started teaching, I was all about giving homework. I truly felt that homework helped to reinforce what was learned in class and that it gave parents the opportunity to see what their child was learning in school and the chance to help them with things they were struggling with. 

Little did I know, homework would become the bane of my existence. I spent so much time tracking down assignments that weren't turned in, talking to students about the importance of them doing their own homework (and not their parents doing it for them). I also became frustrated with parents trying to teach kids the 'easier way' of doing math, the way that we all learned when we were younger when I was trying so hard to build conceptual understanding during school.

 Homework was becoming a waste of time for me because my intentions of assigning it were not being met. Those students who needed the extra help at home, were the ones not getting it. 

I also began to reflect on the amount of time my homework was taking up. I began asking parents how long it was taking their child to complete homework. What I imagined would be a 30-40 minute homework routine, was taking up to 2 hours for some kids. This is NOT what I wanted. My students work extremely hard during the day and I want for them to have time to be a kid and unwind after a long day at school. 

Since I knew that my purpose of assigning what I assigned was not having the outcome I had hoped for, I decided to scrap it all. I came up with an entirely new homework routine that worked amazingly well. 

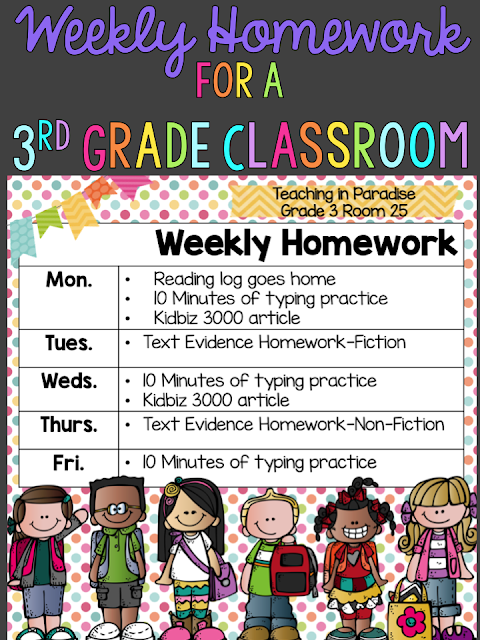
Each Monday I assign a new reading log. Students are required to read a minimum of 100 minutes per week. They can choose what days they would like to read and for how long. Reading logs are due every Monday morning.


The reason I stuck with a reading log is that I felt it was important that my kids actually read. If they want to become better at something, they need to spend time practicing. 

I also spent time stocking my classroom library up with TONS of books to help encourage my students to find new books. I never wanted not having anything to read to be an issue. For ideas on how to grow your library on a teacher budget, click here.

Before assigning these reading logs, I always model what a quality response looks and sounds like. We practice writing responses together as a class before I send these home. 

I believe that reading should be enjoyable, and I highly encourage my kids to read books that they love and are interested in. I require just one response because I do want to hold them accountable for their reading and I also feel that this helps them with their writing and provides me with check-in on their comprehension. Logs are collected on Monday mornings and a new reading log is issued. 

You can find these reading logs here. The product contains 4 different reading logs AND a digital option  You can give a different log each week so that students are not always answering the same question. 


Photo from Luckeyfrog's Lilypad
On Tuesday and Thursdays, I assign Text Evidence homework. I hand out a double-sided sheet every Tuesday. One side is a fiction reading and the other side is a non-fiction reading. On both sides, students are practicing finding text evidence to answer 5 different questions. 

These text evidence passages are quick, simple, but effective. When my littles come to me at the start of the year, locating text evidence is always so difficult for them. These sheets as homework really help to build proficiency with locating text evidence. Here is a GREAT post from Jenny, the creator of the Text Detectives product I use on how to get kids to refer back to the text. 

Students are given the option of how they complete these assignments. They can do one side and turn it in on Wednesday morning. This will get returned to them by Thursday morning. Thursday night, they can complete the other side and turn it in for credit on Friday morning.
The other option is for the student to complete both sides on Tuesday night, turn it in on Wednesday and be done for the week.  To see how I manage collecting homework assignments, you can read all about it here.

The only other homework that I assign on a weekly basis is online homework. The first is Kidbiz3000 (only because it's a school requirement) and the other is typing practice. 

The reason I assign typing practice is that at the ending of the year, our 3rd graders are required to take the SBA. It is so important that students know how to type as they are required to give many extended responses for their answers. I started to practice giving my students their weekly Reading Wonders Assessments online and I found that the quality of their typed responses for #21 were so weak compared to their handwritten responses when given a paper-pencil assessment. I realized that the reason for it was because it took them way too long to type, so they wrote as little as they could. 

I don't collect anything to check that they did their typing homework, no do I have them log minutes. I can tell who has practiced typing by watching them on the computer during class. I just continue to encourage them to practice on their own as it will truly benefit them in the long run. I also used to try to schedule lab time so that students could practice playing games on various typing programs. This is key as this is often a 'hook' for them to realize typing practice is fun! 

What does your homework routine look like?? I'd love to hear about it in the comment section below! 

Thursday, July 21, 2016

5 CHEAP & Easy Hacks that will save you TIME

That photo says it all. 
For all the teachers out there reading this, you know exactly what I mean by the words Beginning of Year Teacher Tired. There is no other tired like it. 
Today I'm here to help you by sharing some CHEAP, SIMPLE, and EASY hacks that will help to save you time, keep you a little more organized and hopefully help you keep some of your sanity as you're kicking off this school year. 
The best thing about the things that I'm about to share with you today is that you can implement them ASAP. You won't need to head out to buy much because I'm sure you have most; if not all of these supplies lying around your home AND classroom. 
Let's get to it!
This hack is easy peasy! All you need to do is print out student names on address labels. You could also hand write them, but that would definitely take a LOT longer...we're all about saving you TIME in this post ;) 

You can use these labels to quickly and easily to label student supplies! For me, it was always crazy and hectic on the first day of school. In 3rd grade, parents still like to walk their kiddos to class...and talk to the teacher about how Johnny is going home. Also, students are still nervous. As a teacher, we are always busy calming those first day jitters of both student and parent. We get TONS of supply bags handed to us. AND lets face it, even though we ASK nicely for all supplies to be labeled (or even the bag)---they aren't. What I do is just slap a label onto the outside of the bag of supplies. This way, I won't accidentally give Johnny's supplies so Sarah :/ At the end of the day, I can quickly look at the outside label and put Johnny's supplies into his cubby. <--I usually don't waste any time on the first day having students unpack their own supplies. I wait until the end of the day to do this. 

Another way you could use these labels is to label expo pens, sharpies, or markers. In my classroom, we used our Expo pens all the time....and there were ALWAYS Expo pens all over the place! The worst thing about it though was that 1) nobody ever knew who it belonged to and 2) I always had at least 3 kids who were out of/couldn't find their pen. This way, anytime one ends up on the ground, whoever finds it can easily return it!


This next hack will also save you TONS of time with prepping for back to school. 

One thing that I always do is that I laminate everything before I write anything on it. I wrote student names on the lamination so that if there are any changes, I can easily change it (rather than having to make a new item and laminate again). 

These erasers are magical!

They take sharpie off on any laminated materials with so much ease! 


When my students turned in their notebooks, I always hated having to flip through all the pages to find the page I was looking for. I started to have them leave their books open to the page...on my kidney table. The thing I didn't like about that was that it took up so much space. 

A saw this genius idea in a 1st-grade teacher's classroom at my school. She uses rubber bands to mark the spot in student notebooks. 

This way, you can still collect your notebooks in bins (and have it be nice and organized). 
All you'll need for this next hack are envelopes and washi tape. All I did was cut the corner off of the envelope (you could 2 bookmarkers from each envelope).  Workbooks were also another things that I hated thumbing through. Since workbooks are flimsier than notebooks, the rubber band hack won't work for this. Instead, you could create bookmarks for workbooks. All students would need to do is slip the marker onto the page they just completed. 

If you use student numbers in your class, you could also go ahead and number each marker. This way, if any of them happen to go missing you'll know exactly who they belong to AND when that infamous No Name paper comes along, you won't need to thumb through and inspect the handwriting to figure out who it belongs to! 

This next hack is to help keep track of your disappearing supplies. Teachers spend so much of their own money buying school supplies--so that their students can use them if when they lose their own supplies. If your classroom is anything like mine, pencils disappear before my eyes! I finally got fed up with having to open up new boxes every other day......

Use Washi Tape to 'mark' your pencils. This will help teachers to keep track of their own stash--so students can't claim the pencil as their own! 

I simply use washi tape to make little pencil flags on my personal stash of pencils. This way, I can lend them out and easily see which are mine. I require all of my pencils to be returned at the end of the day---so that I can sharpen them. 

One of my follower on Instagram suggested also writing student numbers on each flag. That way, the student would borrow their designated pencil. She said that she does pencil checks throughout the day, to ensure that students still have it!

I hope that these tips I shared today can help you in this upcoming school year. If you decide to try out any of these hacks, I'd love to see them in action! Tag me on Instagram @Teachinginparadise

Until next time,

Monday, July 18, 2016

Oceans of Steals, Deals, and Giveaways {Week 2}

Aloha everyone and welcome back to a 2nd week of some great deals!!

If it's your first time here, this is how things are going to work:
 Each day of the week I (along with others) will be highlighting special deals in our TpT stores that will run for that day only. All you need to do is search the given #hashtag for the day on Teachers Pay Teachers.

Here's a sneak peek at what I'll be offering this week:
On Monday I'll be slashing prices on Unit 1, Week 1 of my Reading Wonders resource and my August Morning Math.  Be sure to search TpT for #MondayMadness to find all of the other $1 deals!!
Whale of a Sale on Teachers Pay Teachers.  A different sale each day.
On Tuesday it'll be 2 for Tuesday. You will find 2 products from my store listed for half price! This week you can get a steal on my Rounding Task Cards and my  Elapsed Time Task Cards 


On Wednesday, I'll post random flash freebies on my FB Page! I'll be setting certain goals for each flash freebie--if we can meet them, I'll continue to post new flash freebies throughout the day!! 

 Thursday is thrifty Thursday! When searching the hashtag, you'll be able to get some MAJOR steals on BUNDLES!! I'l be marking my Unit 1 Bundle down to only $12.50.

Last but not least, the best day of all will be FREE Stuff Friday! 
We will again be giving away $350 worth of gift cards. By entering in the Rafflecopter below, you have the opportunity to win a $50 gift card (from one of the places below).


Sunday, July 17, 2016

Pinterest Aprroved Recipe Link-Up: July Edition

Hi friends! Welcome back to another month of sharing our quick, easy, and yummy Pinterest Approved recipes. 

I'm entering my last week of summer vacation :( This is a perfect time to link up and browse around for some easy recipes to do throughout the year! I've tried quite a few recipes from Pinterest that were just o-kay...or not so good at all. After a long day at work, I want to come home and eat something G-O-O-D. I'm anticipating a busy year ahead as our school is getting accredited with WASC ....and lucky me, I'm on the writing committee :/  I'll really need to work ahead on my meal planning so that I'm not buying take out every night!! 
Enough with my blabbing...let's get started!

If you're new to this link up, the rules are easy! 


photo and recipe via Budget Savvy Diva
This spanish rice is SO good and super simple to make! It definitely tastes a lot better (and is probably better for you) than the boxed version of spanish rice. 

Spanish Rice

Spanish Rice Recipe- slightly adapted
Ingredients:
  1.  1 1/2 cups uncooked white rice 
  2. 1/2 medium size onion (chopped)
  3. 1 tablespoon oil 
  4. 1 teaspoon cumin
  5. 1 cup hot salsa (we like spicy foods--and hot gives a pretty good kick! If you aren't a spice fan or have kids, I'd knock it down a notch or two with mild or medium)
  6. 2 cups of chicken broth
Directions:

  • Add oil to a hot skillet on medium heat- add onions and cook for 5 minutes
  • Add rice and stir. You want to brown the rice a bit
  • Once rice is a bit brown (about 5 minutes)- add cumin, salsa, and chicken broth.
  • Cover and reduce heat to low
  • Check on it 20 minutes later. Have yourself a sample--it should be cooked. If not, cook for a few more minutes. 
photo and recipe via Chocolate Therapy
This is the EASIEST thing to prep....like EVER! There basically is like no work invovled with this crockpot recipe!!

Simple Crockpot Chicken Tacos

Ingredients:
  1. 6 boneless skinless chicken breast, thawed
  2. 1 1oz. envelope of taco seasoning
  3. 16 oz. jar of salsa
Directions:
  • Dump all the ingredients into your crockpot. Give it a stir to mix up the seasoning and salsa. 
  • Cook on high for 4-6 hours or low for 6-8 hours
  • When done, pull the chicken out, throw it into a bowl and use a hand mixer to shread the chicken!
  • Place chicken in tortilla and ENJOY! 


These recipes go perfectly together and will take you no time to whip up. We usually start the rice and then take our dogs out for a walk while it cooks. When we get home, the house smells amazing and dinner is ready! 

I look forward to bringing you more yummy recipes on the 3rd Sunday of next month! If you'd like to check out my past Pinterest Approved Recipes you can find that herehere, and here.

Please consider following me on Pinterest, I have tons of food boards, education boards, organization, and wedding boards! 

I hope you'll take the time today to share YOUR favorite Pinterest Approved Recipes :) 

    Monday, July 4, 2016

    Oceans of Steals, Deals, and Giveaways {Week 1}

    Good Morning and Happy 4th of July, Friends! 
    I'm spending the weekend on the beautiful island of Kaua'i soaking up the sun, sand and enjoying time lounging at this beautiful pool! 

    Before I head on out, I wanted to let you all know about some fabulous DEALS and Givewaways that will be happening throughout the next 8 weeks to help teachers get ready for back to school!!
    I'm teaming up with a bunch of other TpT Sellers/Bloggers to bring you our Oceans of Steals, Deals, and Giveaways!
     
    How it works is that each day of the week I (along with others) will be highlighting special deals in our TpT stores that will run for that day only. All you need to do is search the given #hashtag for the day on Teachers Pay Teachers.
    Here's a sneak peek at what I'll be offering this week:
    On Monday I'll be offering up my Editable Rainbow Labels and one of my top sellers, my Measurement Worksheets for $1 each.  Be sure to search TpT for #MondayMadness to find all of the other $1 deals!!
    On Tuesday it'll be 2 for Tuesday. You will find 2 products from my store listed for half price! This week you can get a steal on my Chalkboard and Quatrefoil Lesson Plan Book and my Rainbow Brights Lesson Plan Book (both have editable covers). 

    On Wednesday, you'll have to keep your eyes open for some flash freebies that may happen at any time throughout the day. I'll post about it on my FB Page, so be sure to follow me so  you won't miss out! I may or may not be having 2 Flash Freebies that you won't want to miss out on! (wink, wink) 

    On Thursday my Morning Math Bundle {August-December} will be on sale for only $6.25


    Friday is the day that you DON'T want to miss out on! We will be giving away $350 worth of gift cards!! Be sure to enter below for a chance to enter and WIN a $50 gift card to one of the 7 places below!! 


    Tuesday, June 28, 2016

    Tech. Tip Tuesday-Google Translate

    Aloha, friends! I hope that you are all enjoying your summer break!!

    I'm back today with another technology tip :) Today we are talking all about Google Translate.

    Have you ever used Google Translate? If not, here are 5 great ways that it can be a tremendous help in your classroom!
    Is there more than one language spoken in your class? Maybe the primary language for your class is English, but you also have non-English speakers or English Language Learners in  your classroom? Are you thrilled to have more diversity, but wonder how to handle the challenges it brings, and more importantly, how to best help those second language students? HELP, in the form of Google Translate, is only a finger click away!

    Whether you're a classroom teacher, or just someone who enjoys traveling and learning other languages, Google Translate has many amazing features!

    For teachers, some of the best features of Google Translate are:
    1. Google Translate works both online and offline. If you're not online, or you're out and about, Google Translate has an app that's FREE in the iTunes store!
    2. Google Translate has a Common Phrasebook option (for commonly used/translated words & phrases) and an audio pronunciation guide to make learning so much easier for your second language learners!
    3. Need to send home a school-issued document like a notice, form or a class newsletter? The camera function on the Google Translate app will translate the printed documents, posters, & even street signs! If you're online, you can upload the entire document in the Google Translator Toolkit and it will instantly translate it for you, then it's ready to print in the target language!
    4. The Google Translate app can even translate a handwritten note! (For example: a parent sends in a note to you in another language) #Amazing 
    5. Do you often need to send home a personal note to parents who speak another language? Google Translate will instantly translate your text into the target language. (Over 90 languages are available!)
    Whenever you have students in your class whose first language is not English (or differs from the primary language spoken in your class) it's essential to make sure that their parents feel connected to what's going on in your classroom. Here's an even better way to save 'teacher-time' with Google Translate: Teach a student (choose one who's always an early finisher), how to use Google Translate, then you can have them translate all the school documents/classwork that will go home to parents!

    Another benefit of making the effort to communicate with parents whose first language is not English, (or the primary language of the class), is that it also reflects well on you during your yearly evaluation! You made the effort to keep those parents informed and feel welcomed! (Make sure you point out to your principal/administrators that you've been proactive in reaching out to parents in this way!)

    You can also broaden your students' view of the world by establishing a global pen-pal program! Google Translate will make it EASY for your class to communicate with other children from around the world! Your students will love taking ownership of sending and receiving (& translating!) their global pen-pal emails! Think of the tangential learning that could come from this--geography lessons, government/history/culture lessons, are lessons, climate lessons, animals & their habitats--the possibilities for learning are endless! 

    Here's a brief 'how-to' on Google Translate to get you started:

    There are two ways to get to Google Translate, go to www.translate.Google.com , or you can go to the Goole Sign-in page (no sign-in needed) and...
    1. Look for a small blue sign-in box in the top right corner. Next to it, you'll see a "waffle" looking icon with nine tiny boxes.
    2. Click on the waffle and a separate window will open.
    3. Look at the bottom of the set of icons and you'll see the button that says Translate, this opens up Google Translate. 
    4. From there, a new window will open and you'll see two smaller text windows. 
    5. The window on the left side is where you type in the text to be translated -- (or click 'upload' for a document) and you'll notice that it pops up automatically in the window on the right side. 
    6. In the window on the right-hand side, simply click the box above it for the target language you need. 
    7. Another awesome feature: There's a little speaker icon at the bottom of the text window, simply click on that speaker and the words in the target language will be spoken aloud to demonstrate the correct pronunciation!

    Here is a link if you want to give it a try!

    Do you know of other ways that Google Translate can be helpful in a classroom setting? If so, I'd love it if you took a moment to share your ideas in the comment section below!
    Until next time,